
Exploring Entity Framework Part 3: The Database First Approach
NOTE: This post is part of a series on Entity Framework 6. To help cut back on overlapping content, this post will not cover any concepts that were previously discussed earlier in the series. If you have not read my previous two posts, you can access them from the links below:
Exploring Entity Framework Part 1: A Brief Overview
Exploring Entity Framework Part 2: The Code First Approach
Welcome back again to my series on Entity Framework! In my last post, I covered how to make use of the Code First Approach, which is widely preferred by developers who will need to create their own databases from scratch and manage them through the application. I also covered how to use the Code First Approach with an existing database. While it is possible to implement Code First with a database that will be managed by your DBA, it does have its limitations. For example, if a DBA were to make a change to a table your application used, you would need to manually code the adjustment in the corresponding model of your application. Depending on how many changes were made, this could be a time consuming process. However, there is an easier way to manage our application with minimal intervention (which I will discuss later). Below are the topics I will be covering:
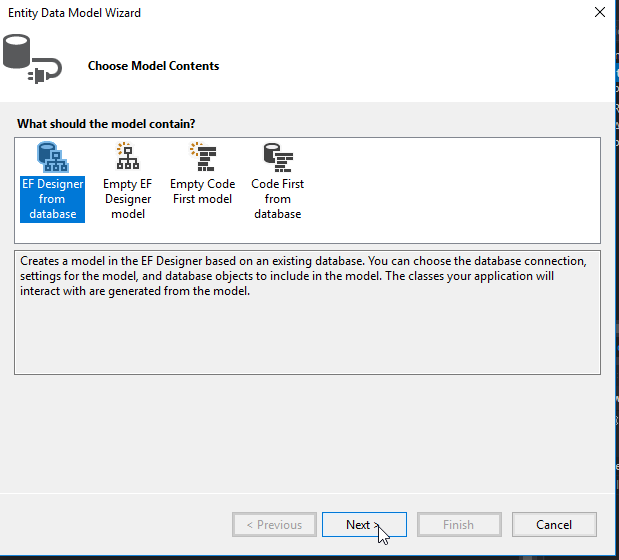
 Select EF Designer from database and click Next
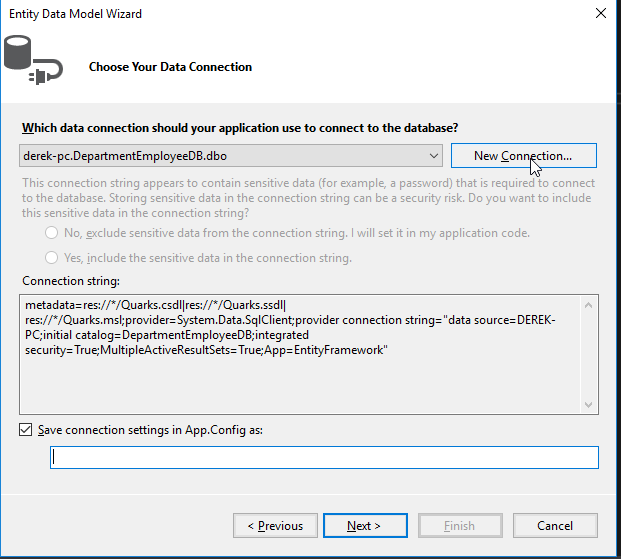
Select New Connection
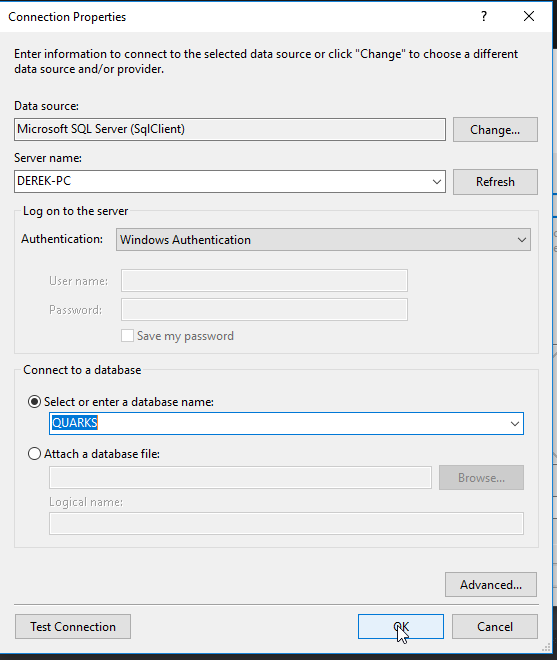
Select the Server Name and Quarks for the Database Name (assuming the code to recreate it has been run in your RDMS), then click OK.
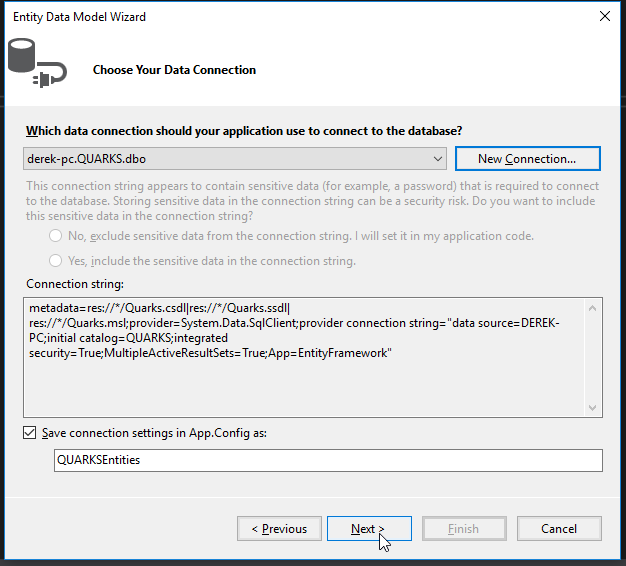
Click Next
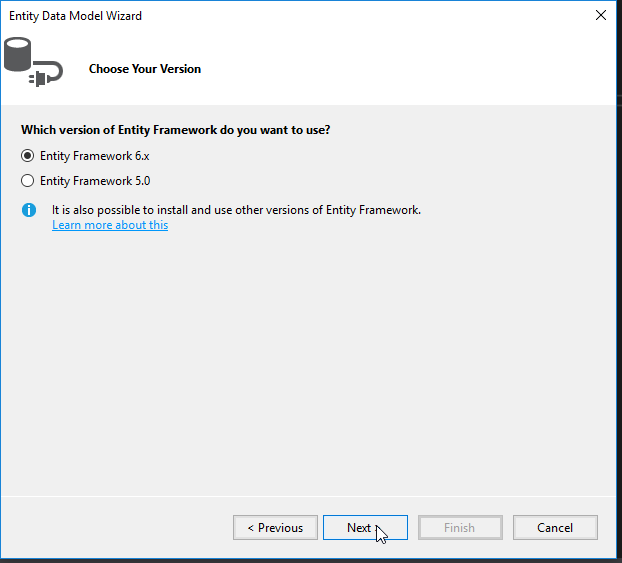
Ensure Entity Framework 6 is selected and then click Next
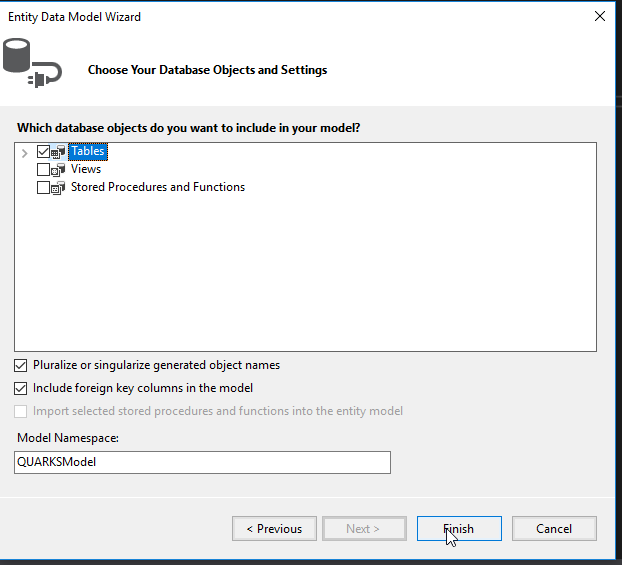
Check the Tables box and then click Finish
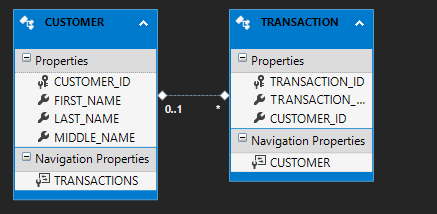
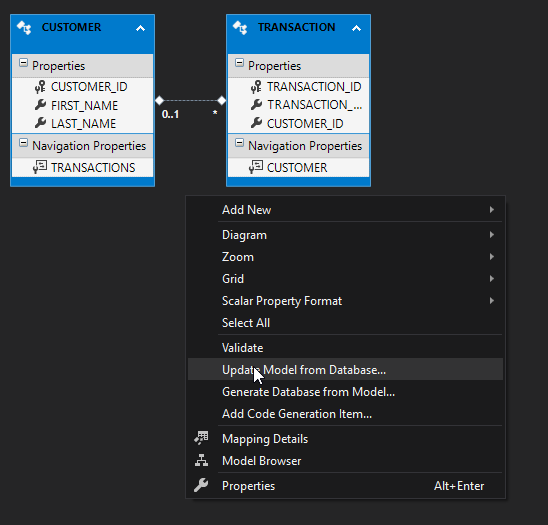
We see that our .edmx file is generated, and the tables appear as a diagram. Upon examination, we see that a customer can have many transactions, but a transaction can have one or zero customers (if we wanted the tables to have a one to many relationship, we would have needed to make CustomerID NOT NULL in the Transaction table).
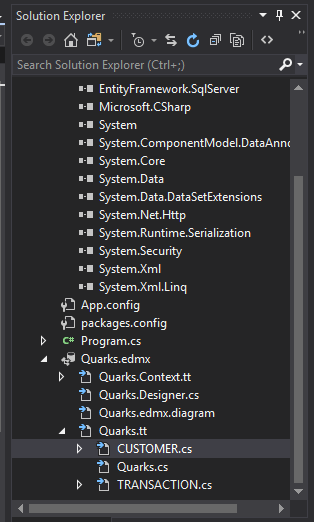
When we expand our .edmx file in the Solution Explorer, we see that our models are already generated for us as .cs files. Let’s take a closer look at the code.
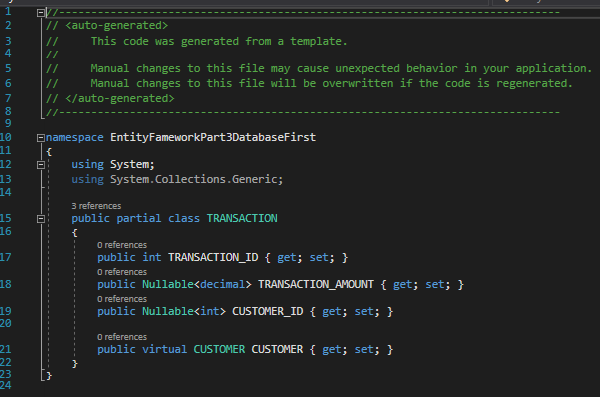
In the Transactions model, we notice our code looks very similar to what was generated when we used this database in our Code First tutorial, but with one difference.
Transaction.cs
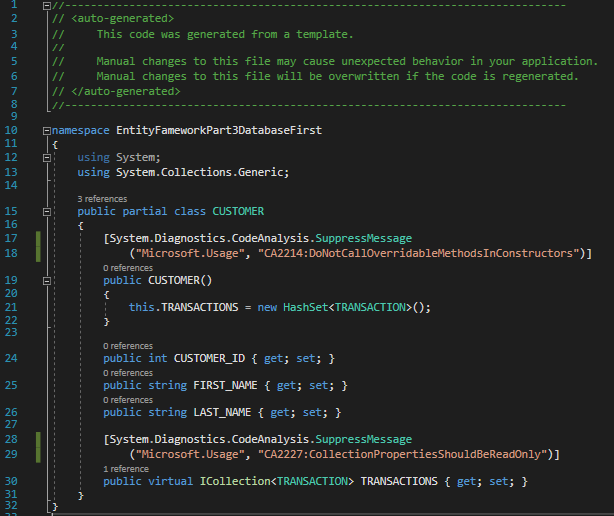
The comments at the top advise us against modifying the model manually. We see this repeated in our Customers model.
Customer.cs
This is because the purpose of the Database First Approach is to allow the developer to focus on the program without concerning themselves with the state of the database. Any changes to the database can be pushed to the application by simply updating the .edmx file.
Updating Our Models After Database Changes Are Made
To get a better idea of how model updates work, we will add a new field (called Middle_Name) in our Customers table from the RDMS.
After running the command, navigate to Quarks.edmx and right click anywhere, then select Update Model from Database.
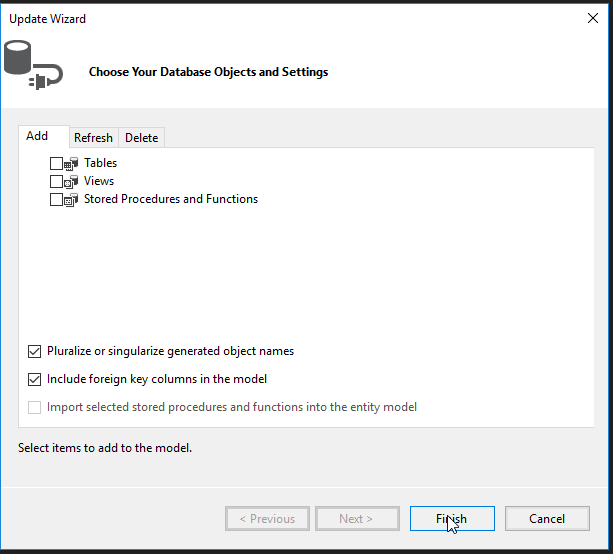
Since we simply modified a table being used in our program, all we need to do is select Finish (Tables in the database can be added/removed from the program from this window).
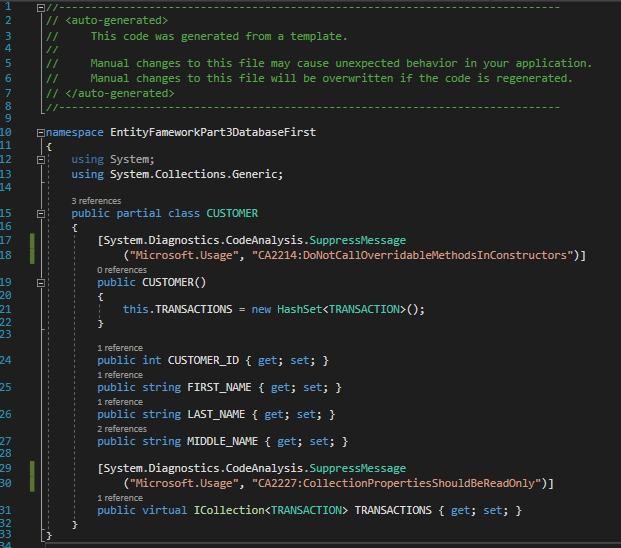
We now see that our Customer model has the Middle_Name field added to the diagram and code. Click inside the edmx diagram and hit CTRL + S to save the file so that the change will be applied to the model.
Customer.cs
To ensure that the code change has worked, run the SQL below in your RDMS
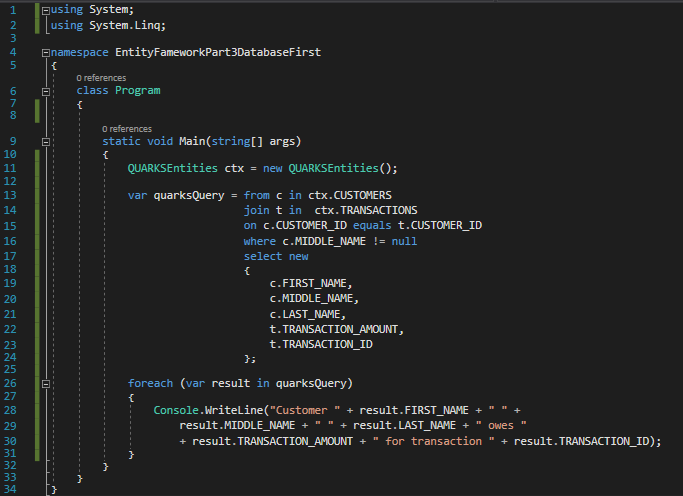
Then modify Program.cs to appear as it does below
Program.cs
We see that our change is applied and we can query successfully.
Customizing Our Models With Partial Classes
Let’s say Quark wants the ability to add new customers to the Customers table. To do this, we will need to comment out the code below the declaration of the ctx object in Program.cs and add the code shown below to the file.
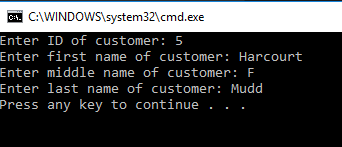
We can then run the console app an input the information below. However, there does seem to be a problem. Quark wants to know the FULL NAME of his patrons, and therefore wants to ensure that his employees are not simply throwing in a middle initial in place of a full middle name. In this case, we were able to pass the middle initial (F) for Harcourt Fenton Mudd, when we should have used “Fenton” in its place. To prevent this from happening again, we will need to add validation to our Customer model.
However, we already know that each time we update our Models based on what is in the database, any information that does not conform to the database design will be overwritten. How can we ensure that validation remains after each update?
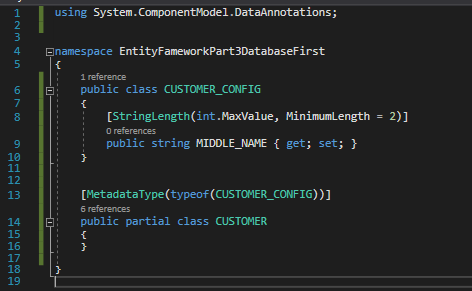
In the Solution Explorer, add a new class called CUSTOMER_CONFIG, and replace the generated code with what you see below:
What does this code mean? On line 8, we see that we are adding a Data Annotation to the MIDDLE_NAME field of the CUSTOMER_CONFIG class that ensures all entries that have at least a length of 2 are valid. In lines 13 through 16, we are telling our program to apply the validation for MIDDLE_NAME in the CUSTOMER_CONFIG class to MIDDLE_NAME in the CUSTOMER class using the MetadataType Data Annotation.
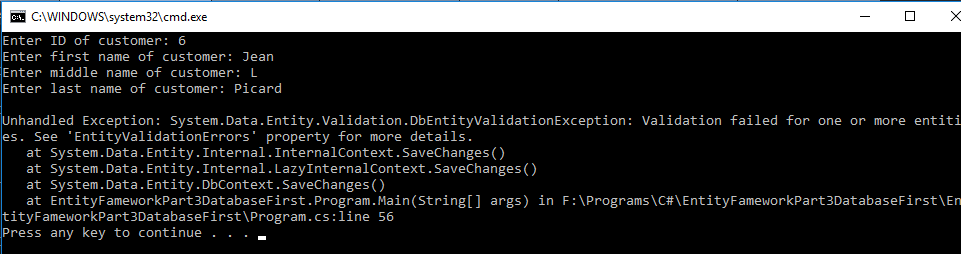
When we run the program and input a new name we hit an Unhandled Exception. If we read this error, we see the message “Validation Failed for one or more entities”. This means that our program is refusing to input the entry because the MIDDLE_NAME entry is only one character long.
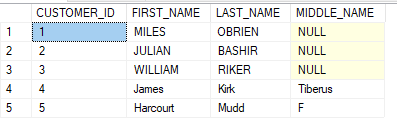
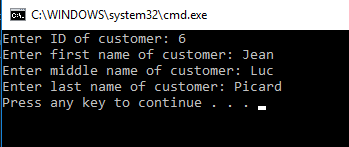
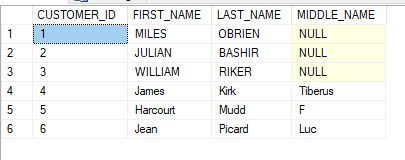
If we run the program again, but give MIDDLE_NAME a string with more than one character, we see that it works. This is also confirmed in our CUSTOMERS table.
You may be wondering how we are able to declare the Customer class twice in our program. If you look at both declarations, you will see that the “partial” keyword precedes “class Customer”. This tells our program to combine both declarations as one class.
Summary
The Database First Approach is an excellent choice for developers who require minimal management of their application’s models, as Entity Framework will generate the necessary code based what it sees in the database. Should an event arise where the developer needs to add customization to the models, partial classes can be used to ensure that any additional features added are not overwritten with each update. Join me next time, as we conclude our series by exploring the Model First Approach.
Have any questions, comments, or concerns about this post? Notice anything that can be added or improved? If so, please let me know in the comments. I look forward to hearing from you!
Select EF Designer from database and click Next
Select New Connection
Select the Server Name and Quarks for the Database Name (assuming the code to recreate it has been run in your RDMS), then click OK.
Click Next
Ensure Entity Framework 6 is selected and then click Next
Check the Tables box and then click Finish
We see that our .edmx file is generated, and the tables appear as a diagram. Upon examination, we see that a customer can have many transactions, but a transaction can have one or zero customers (if we wanted the tables to have a one to many relationship, we would have needed to make CustomerID NOT NULL in the Transaction table).
When we expand our .edmx file in the Solution Explorer, we see that our models are already generated for us as .cs files. Let’s take a closer look at the code.
In the Transactions model, we notice our code looks very similar to what was generated when we used this database in our Code First tutorial, but with one difference.
Transaction.cs
The comments at the top advise us against modifying the model manually. We see this repeated in our Customers model.
Customer.cs
This is because the purpose of the Database First Approach is to allow the developer to focus on the program without concerning themselves with the state of the database. Any changes to the database can be pushed to the application by simply updating the .edmx file.
Updating Our Models After Database Changes Are Made
To get a better idea of how model updates work, we will add a new field (called Middle_Name) in our Customers table from the RDMS.
After running the command, navigate to Quarks.edmx and right click anywhere, then select Update Model from Database.
Since we simply modified a table being used in our program, all we need to do is select Finish (Tables in the database can be added/removed from the program from this window).
We now see that our Customer model has the Middle_Name field added to the diagram and code. Click inside the edmx diagram and hit CTRL + S to save the file so that the change will be applied to the model.
Customer.cs
To ensure that the code change has worked, run the SQL below in your RDMS
Then modify Program.cs to appear as it does below
Program.cs
We see that our change is applied and we can query successfully.
Customizing Our Models With Partial Classes
Let’s say Quark wants the ability to add new customers to the Customers table. To do this, we will need to comment out the code below the declaration of the ctx object in Program.cs and add the code shown below to the file.
We can then run the console app an input the information below. However, there does seem to be a problem. Quark wants to know the FULL NAME of his patrons, and therefore wants to ensure that his employees are not simply throwing in a middle initial in place of a full middle name. In this case, we were able to pass the middle initial (F) for Harcourt Fenton Mudd, when we should have used “Fenton” in its place. To prevent this from happening again, we will need to add validation to our Customer model.
However, we already know that each time we update our Models based on what is in the database, any information that does not conform to the database design will be overwritten. How can we ensure that validation remains after each update?
In the Solution Explorer, add a new class called CUSTOMER_CONFIG, and replace the generated code with what you see below:
What does this code mean? On line 8, we see that we are adding a Data Annotation to the MIDDLE_NAME field of the CUSTOMER_CONFIG class that ensures all entries that have at least a length of 2 are valid. In lines 13 through 16, we are telling our program to apply the validation for MIDDLE_NAME in the CUSTOMER_CONFIG class to MIDDLE_NAME in the CUSTOMER class using the MetadataType Data Annotation.
When we run the program and input a new name we hit an Unhandled Exception. If we read this error, we see the message “Validation Failed for one or more entities”. This means that our program is refusing to input the entry because the MIDDLE_NAME entry is only one character long.
If we run the program again, but give MIDDLE_NAME a string with more than one character, we see that it works. This is also confirmed in our CUSTOMERS table.
You may be wondering how we are able to declare the Customer class twice in our program. If you look at both declarations, you will see that the “partial” keyword precedes “class Customer”. This tells our program to combine both declarations as one class.
Summary
The Database First Approach is an excellent choice for developers who require minimal management of their application’s models, as Entity Framework will generate the necessary code based what it sees in the database. Should an event arise where the developer needs to add customization to the models, partial classes can be used to ensure that any additional features added are not overwritten with each update. Join me next time, as we conclude our series by exploring the Model First Approach.
Have any questions, comments, or concerns about this post? Notice anything that can be added or improved? If so, please let me know in the comments. I look forward to hearing from you!
- Connecting to an existing database and generating models using the Database First Approach.
- Updating our models after changes to the database are made.
- Customizing our models using partial classes.
 Select EF Designer from database and click Next
 Select New Connection
 Select the Server Name and Quarks for the Database Name (assuming the code to recreate it has been run in your RDMS), then click OK.
 Click Next
 Ensure Entity Framework 6 is selected and then click Next
 Check the Tables box and then click Finish
 We see that our .edmx file is generated, and the tables appear as a diagram. Upon examination, we see that a customer can have many transactions, but a transaction can have one or zero customers (if we wanted the tables to have a one to many relationship, we would have needed to make CustomerID NOT NULL in the Transaction table).
 When we expand our .edmx file in the Solution Explorer, we see that our models are already generated for us as .cs files. Let’s take a closer look at the code.
 In the Transactions model, we notice our code looks very similar to what was generated when we used this database in our Code First tutorial, but with one difference.
Transaction.cs
In the Transactions model, we notice our code looks very similar to what was generated when we used this database in our Code First tutorial, but with one difference.
Transaction.cs
 The comments at the top advise us against modifying the model manually. We see this repeated in our Customers model.
Customer.cs
The comments at the top advise us against modifying the model manually. We see this repeated in our Customers model.
Customer.cs
 This is because the purpose of the Database First Approach is to allow the developer to focus on the program without concerning themselves with the state of the database. Any changes to the database can be pushed to the application by simply updating the .edmx file.
Updating Our Models After Database Changes Are Made
To get a better idea of how model updates work, we will add a new field (called Middle_Name) in our Customers table from the RDMS.
This is because the purpose of the Database First Approach is to allow the developer to focus on the program without concerning themselves with the state of the database. Any changes to the database can be pushed to the application by simply updating the .edmx file.
Updating Our Models After Database Changes Are Made
To get a better idea of how model updates work, we will add a new field (called Middle_Name) in our Customers table from the RDMS.
 After running the command, navigate to Quarks.edmx and right click anywhere, then select Update Model from Database.
 Since we simply modified a table being used in our program, all we need to do is select Finish (Tables in the database can be added/removed from the program from this window).
 We now see that our Customer model has the Middle_Name field added to the diagram and code. Click inside the edmx diagram and hit CTRL + S to save the file so that the change will be applied to the model.
 Customer.cs
 To ensure that the code change has worked, run the SQL below in your RDMS
 Then modify Program.cs to appear as it does below
Program.cs
Then modify Program.cs to appear as it does below
Program.cs
 We see that our change is applied and we can query successfully.
 Customizing Our Models With Partial Classes
Let’s say Quark wants the ability to add new customers to the Customers table. To do this, we will need to comment out the code below the declaration of the ctx object in Program.cs and add the code shown below to the file.
Customizing Our Models With Partial Classes
Let’s say Quark wants the ability to add new customers to the Customers table. To do this, we will need to comment out the code below the declaration of the ctx object in Program.cs and add the code shown below to the file.
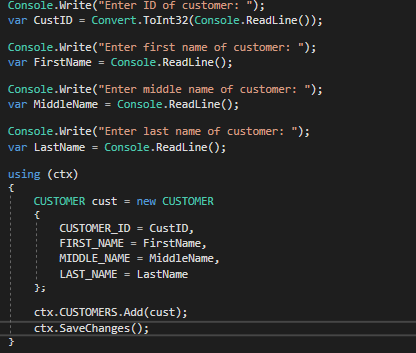 We can then run the console app an input the information below. However, there does seem to be a problem. Quark wants to know the FULL NAME of his patrons, and therefore wants to ensure that his employees are not simply throwing in a middle initial in place of a full middle name. In this case, we were able to pass the middle initial (F) for Harcourt Fenton Mudd, when we should have used “Fenton” in its place. To prevent this from happening again, we will need to add validation to our Customer model.
 However, we already know that each time we update our Models based on what is in the database, any information that does not conform to the database design will be overwritten. How can we ensure that validation remains after each update?
In the Solution Explorer, add a new class called CUSTOMER_CONFIG, and replace the generated code with what you see below:
However, we already know that each time we update our Models based on what is in the database, any information that does not conform to the database design will be overwritten. How can we ensure that validation remains after each update?
In the Solution Explorer, add a new class called CUSTOMER_CONFIG, and replace the generated code with what you see below:
 What does this code mean? On line 8, we see that we are adding a Data Annotation to the MIDDLE_NAME field of the CUSTOMER_CONFIG class that ensures all entries that have at least a length of 2 are valid. In lines 13 through 16, we are telling our program to apply the validation for MIDDLE_NAME in the CUSTOMER_CONFIG class to MIDDLE_NAME in the CUSTOMER class using the MetadataType Data Annotation.
When we run the program and input a new name we hit an Unhandled Exception. If we read this error, we see the message “Validation Failed for one or more entities”. This means that our program is refusing to input the entry because the MIDDLE_NAME entry is only one character long.
What does this code mean? On line 8, we see that we are adding a Data Annotation to the MIDDLE_NAME field of the CUSTOMER_CONFIG class that ensures all entries that have at least a length of 2 are valid. In lines 13 through 16, we are telling our program to apply the validation for MIDDLE_NAME in the CUSTOMER_CONFIG class to MIDDLE_NAME in the CUSTOMER class using the MetadataType Data Annotation.
When we run the program and input a new name we hit an Unhandled Exception. If we read this error, we see the message “Validation Failed for one or more entities”. This means that our program is refusing to input the entry because the MIDDLE_NAME entry is only one character long.
 If we run the program again, but give MIDDLE_NAME a string with more than one character, we see that it works. This is also confirmed in our CUSTOMERS table.
 You may be wondering how we are able to declare the Customer class twice in our program. If you look at both declarations, you will see that the “partial” keyword precedes “class Customer”. This tells our program to combine both declarations as one class.
Summary
The Database First Approach is an excellent choice for developers who require minimal management of their application’s models, as Entity Framework will generate the necessary code based what it sees in the database. Should an event arise where the developer needs to add customization to the models, partial classes can be used to ensure that any additional features added are not overwritten with each update. Join me next time, as we conclude our series by exploring the Model First Approach.
Have any questions, comments, or concerns about this post? Notice anything that can be added or improved? If so, please let me know in the comments. I look forward to hearing from you!
You may be wondering how we are able to declare the Customer class twice in our program. If you look at both declarations, you will see that the “partial” keyword precedes “class Customer”. This tells our program to combine both declarations as one class.
Summary
The Database First Approach is an excellent choice for developers who require minimal management of their application’s models, as Entity Framework will generate the necessary code based what it sees in the database. Should an event arise where the developer needs to add customization to the models, partial classes can be used to ensure that any additional features added are not overwritten with each update. Join me next time, as we conclude our series by exploring the Model First Approach.
Have any questions, comments, or concerns about this post? Notice anything that can be added or improved? If so, please let me know in the comments. I look forward to hearing from you!