
Exploring Entity Framework Part 2: The Code First Approach
 Welcome back to my series on Entity Framework. Before we get started, I have a few items to mention:
– This post is a continuation of my series on Entity Framework. Part 1 can be viewed here.
– In part one of my series, I did not specify which version of Entity Framework we would be covering. For the series, we will be focusing on Entity Framework 6. Entity Framework Core will be covered in a later series.
– I will be including the code for this project on my Github account, which can be found here.
Now that the boring stuff is out of the way, let us dive back in to learning Entity Framework!
The Code First Approach
As stated in my last post, the Code First Approach in Entity Framework allows developers to design a database for their application. Additionally, developers can also connect to existing databases and have full control over the models that interact with its tables. But how is all this done? In this post, I will show you how to:
– Connect your project to SQL Server 2016.
– Design tables using Code First.
– Update existing models using Code First Migrations.
– Auto generate code for models based on tables that already exist in a database.
– Assign properties to our attributes using Data Annotations and Fluent API.
– Cover instances where you may wish to tweak your auto-generated code.
In this tutorial, we will be writing a program that tells us the name of an employee and which department they work in. Let’s get started!
Connecting to a Database
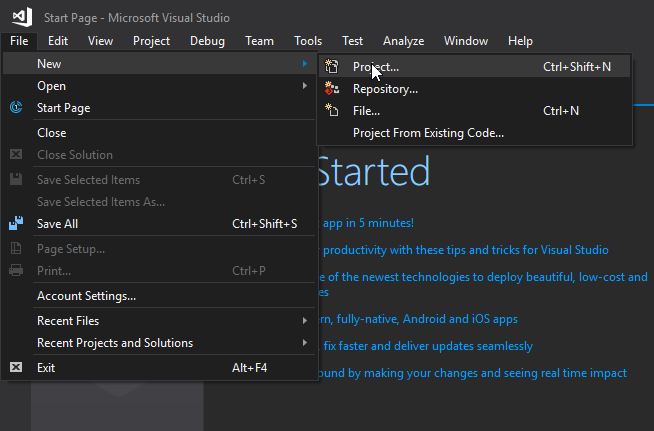
Let’s start by creating a new console application in Visual Studio. Open Visual Studio and click File → New Project.
Welcome back to my series on Entity Framework. Before we get started, I have a few items to mention:
– This post is a continuation of my series on Entity Framework. Part 1 can be viewed here.
– In part one of my series, I did not specify which version of Entity Framework we would be covering. For the series, we will be focusing on Entity Framework 6. Entity Framework Core will be covered in a later series.
– I will be including the code for this project on my Github account, which can be found here.
Now that the boring stuff is out of the way, let us dive back in to learning Entity Framework!
The Code First Approach
As stated in my last post, the Code First Approach in Entity Framework allows developers to design a database for their application. Additionally, developers can also connect to existing databases and have full control over the models that interact with its tables. But how is all this done? In this post, I will show you how to:
– Connect your project to SQL Server 2016.
– Design tables using Code First.
– Update existing models using Code First Migrations.
– Auto generate code for models based on tables that already exist in a database.
– Assign properties to our attributes using Data Annotations and Fluent API.
– Cover instances where you may wish to tweak your auto-generated code.
In this tutorial, we will be writing a program that tells us the name of an employee and which department they work in. Let’s get started!
Connecting to a Database
Let’s start by creating a new console application in Visual Studio. Open Visual Studio and click File → New Project.
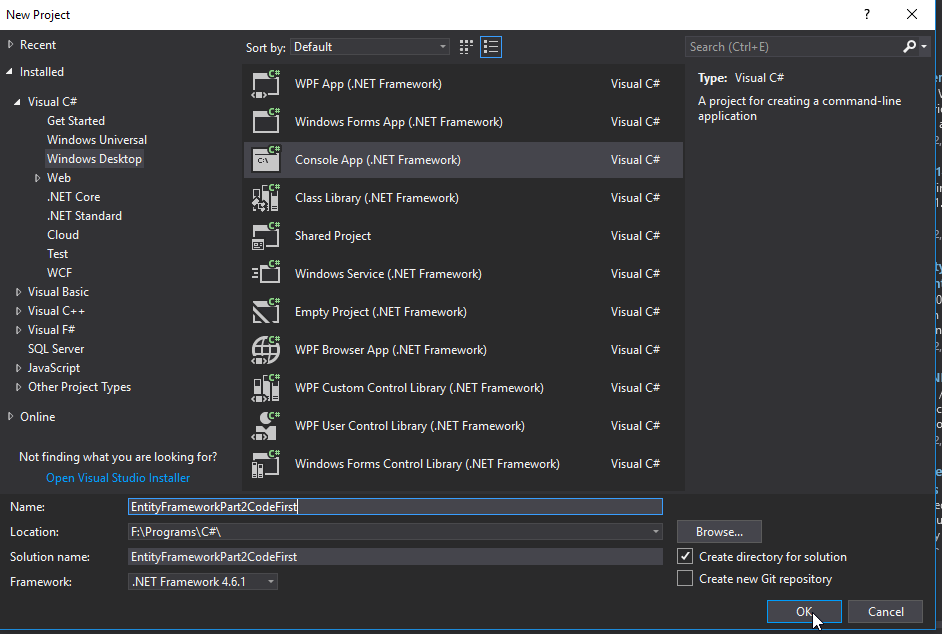
 On the left, select Windows Desktop to see a list of options in the center of the window. Select Console App (.NET Framework) Visual C#, name your program, and click OK.
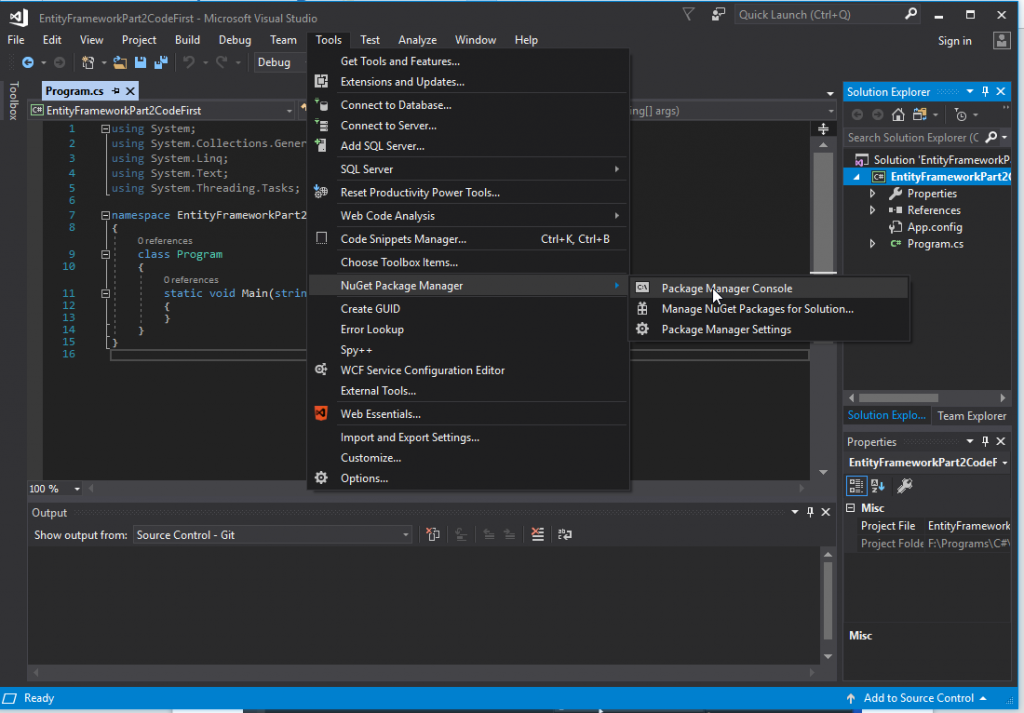
 Our new solution appears. In order to use Entity Framework, we will need to install it to our project. To do this, navigate to Tools → Nuget Package Manager → Package Manager Console.
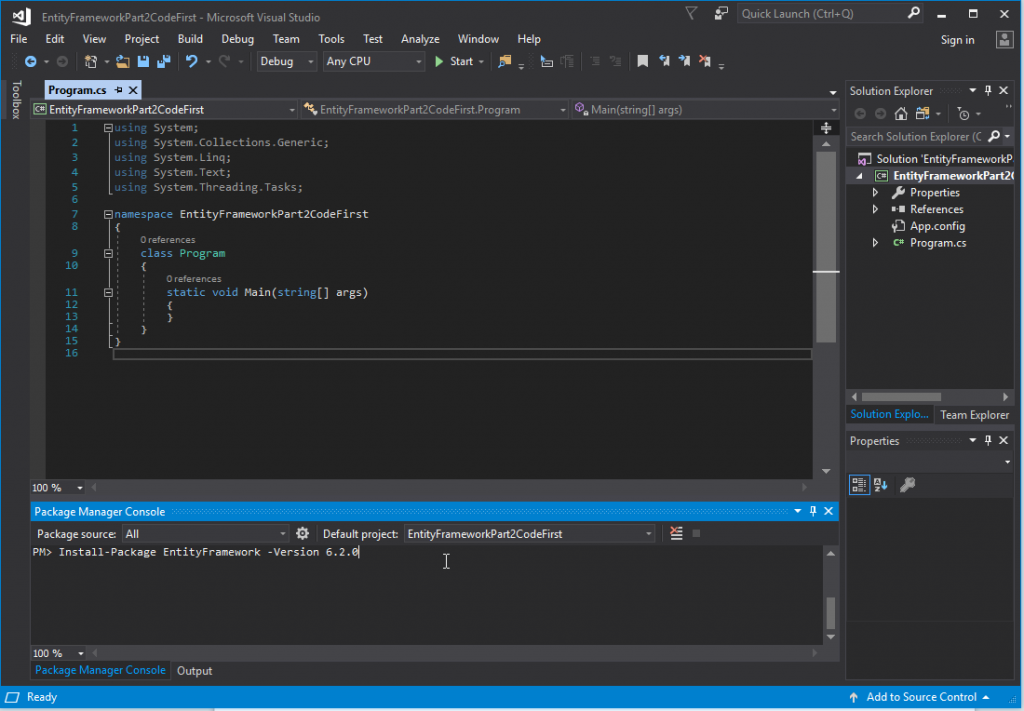
 In the Package Manager Console, type “Install-Package EntityFramework -Version 6.2.0” without quotation marks, and hit enter. This will install Entity Framework to our project.
 Now that Entity Framework has been installed, we will need to create a database context. To do this, right click on your project in Solution Explorer and navigate to Add → New Item.
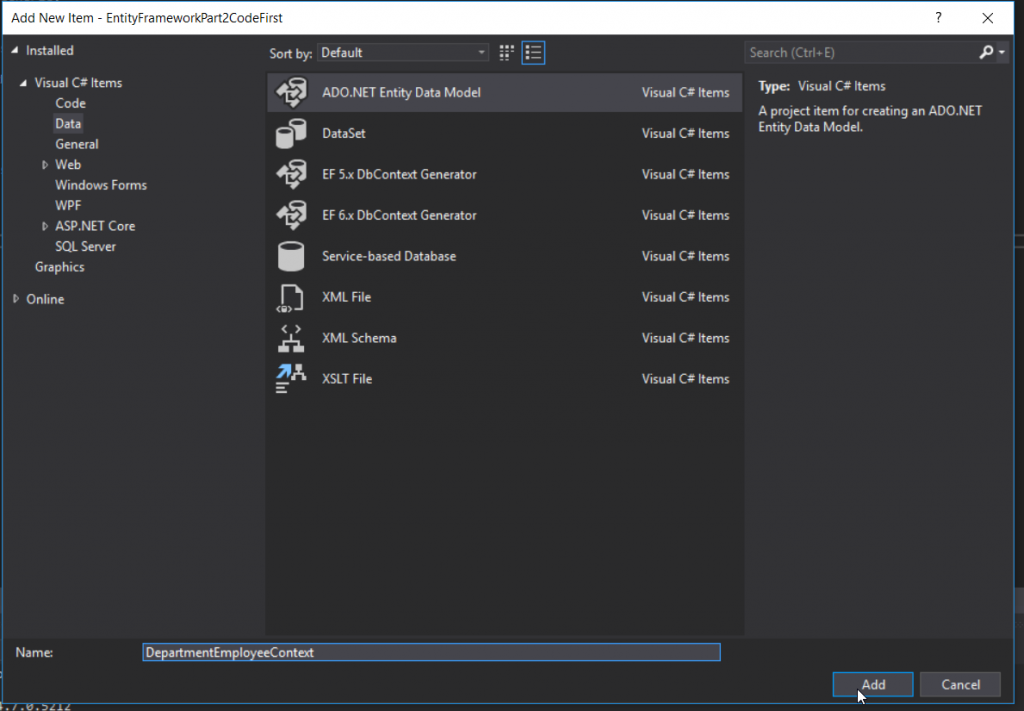
 In the Add New Item window, click on the data tab, and then ADO.NET Entity Data Model. Name the model DepartmentEmployeeContext and then click Add.
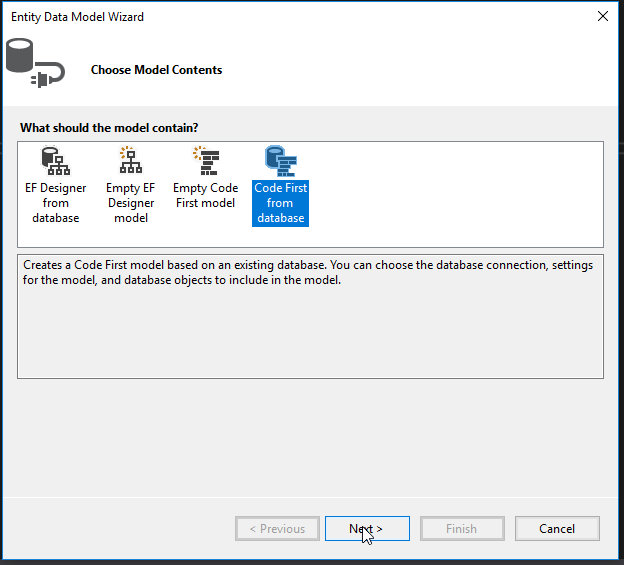
 Since I already have an existing SQL Server, I will need to select Code First from Database.
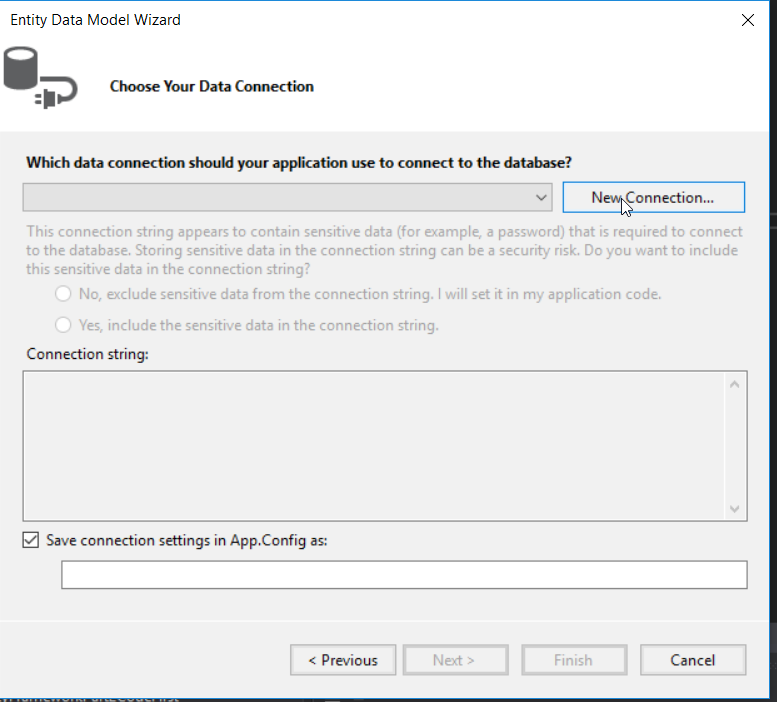
 Select New Connection
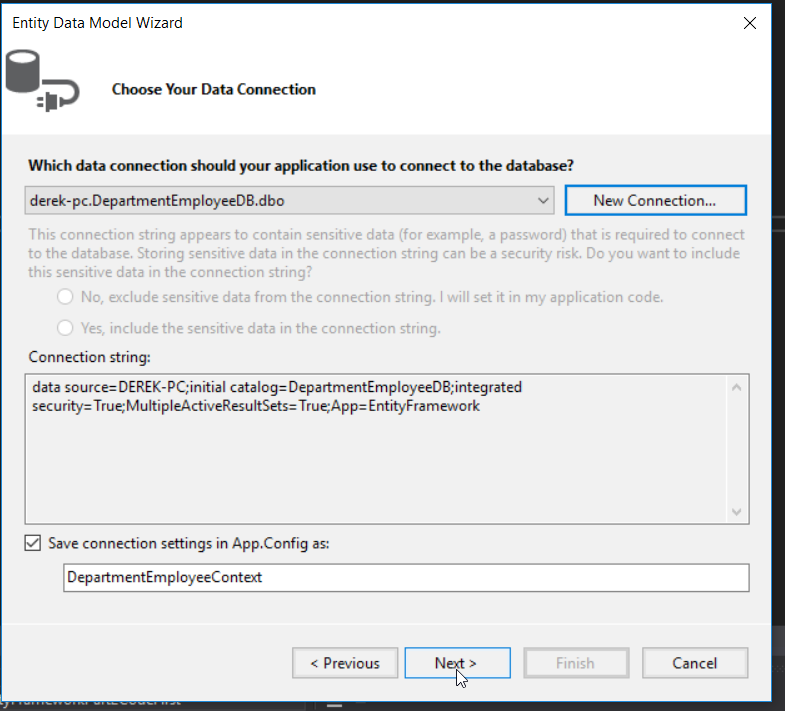
 Choose your datasource (Microsoft SQL Server (SqlClient) for me), and the name of the server that your datasource resides on. In the Connect to a database section, type “DepartmentEmployeeDB” as the name of our new database, then click OK.
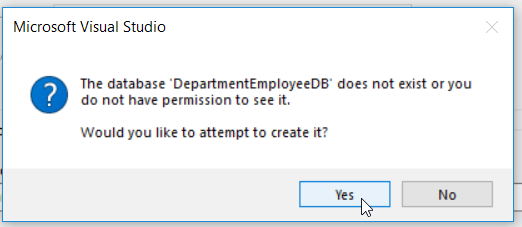
 The following dialog box will appear. Since the DepartmentEmployeeDB database does not yet exist on our server, we will need to select yes to create it.
 Upon being redirected back to the Entity Data Model Wizard, we notice that a connection string to our new database has been generated for us. Click Next to proceed.
 On the next screen, we see that we have no tables or views to select from our database, as we have not created any yet. Click finish to create our context model.
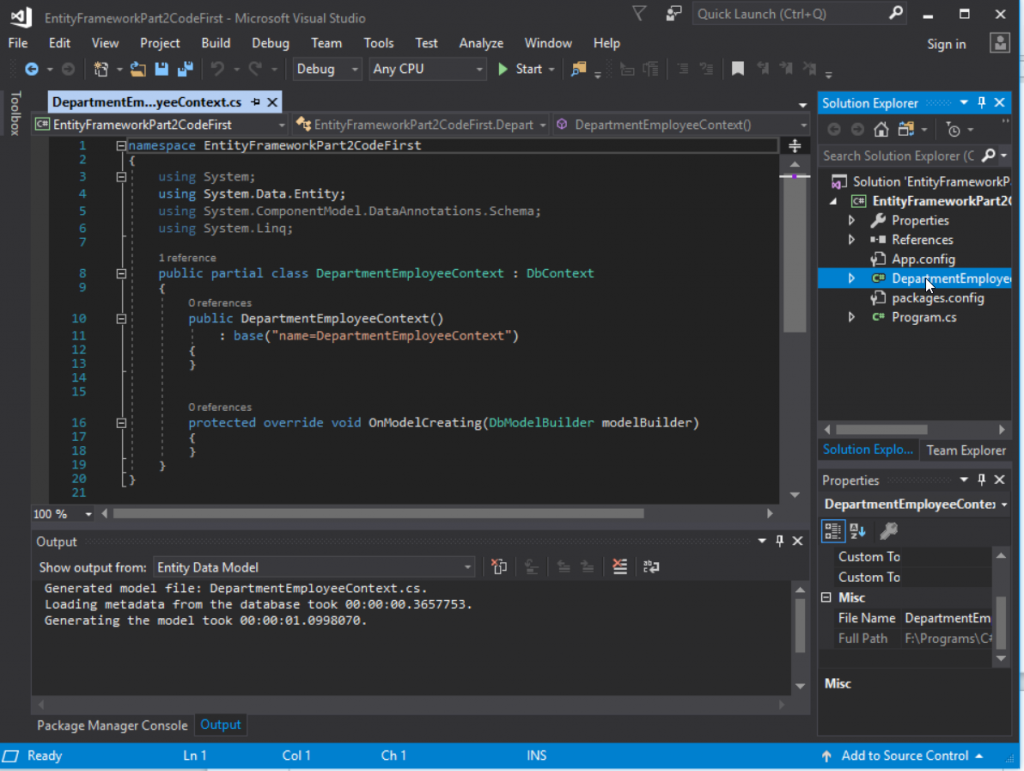
 Entity Framework has automatically generated our database context model code for us in a file called DempartmentEmployeeContext.cs. After creating our models, we will call them in this file.
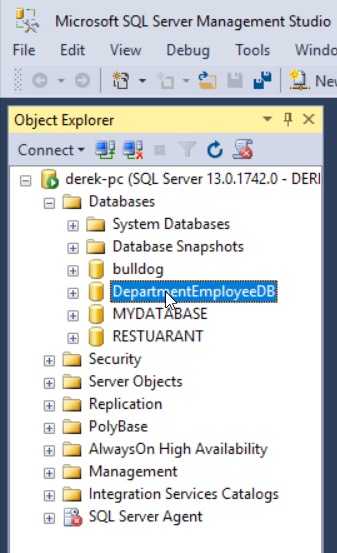
 If we open up SQL Server Management Studio, we can see that our new database has been created for us.
 Design Models Using Code First
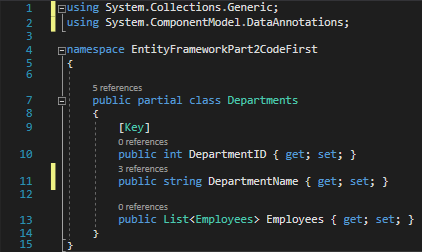
Now that we have our database context setup, it is time to design our models. In the Solution Explorer, create a new class called Departments.cs and populate it with the code below. You will notice that Visual Studio indicates that there is an issue with the employees list. This is to be expected as we have not created the Employees model yet.
Departments.cs
Design Models Using Code First
Now that we have our database context setup, it is time to design our models. In the Solution Explorer, create a new class called Departments.cs and populate it with the code below. You will notice that Visual Studio indicates that there is an issue with the employees list. This is to be expected as we have not created the Employees model yet.
Departments.cs
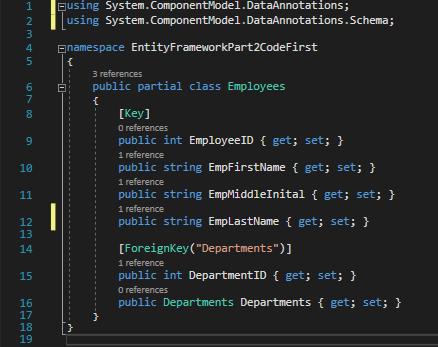
 Create another class in Solution Explorer called Employees.cs and populate it with the code below.
Employees.cs
Create another class in Solution Explorer called Employees.cs and populate it with the code below.
Employees.cs
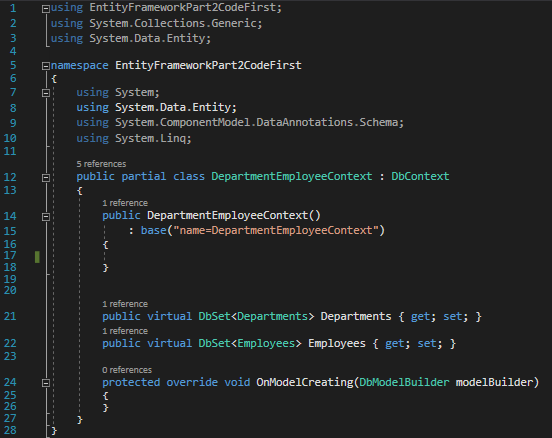
 In our DepartmentEmployeesContext.cs file, modify the code to match the image below.
DepartmentEmployeesContext.cs
In our DepartmentEmployeesContext.cs file, modify the code to match the image below.
DepartmentEmployeesContext.cs
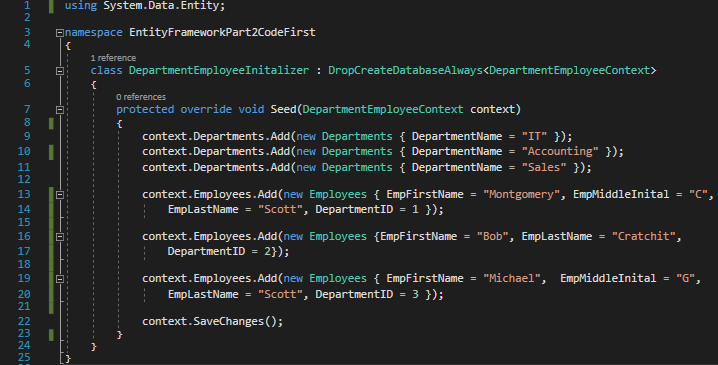
 Now it is time to initialize our data. Create a new class called DepartmentEmployeeInitializer and input the code below:
DepartmentEmployeeInitializer.cs
Now it is time to initialize our data. Create a new class called DepartmentEmployeeInitializer and input the code below:
DepartmentEmployeeInitializer.cs
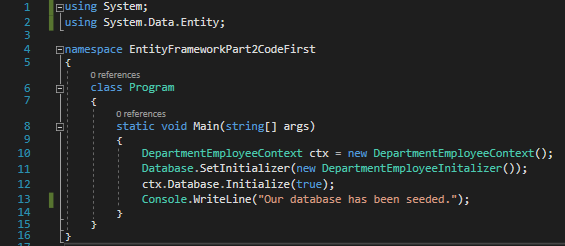
 In the Program.cs file, we need to call our initalizer. This is done with the code below:
Program.cs
In the Program.cs file, we need to call our initalizer. This is done with the code below:
Program.cs
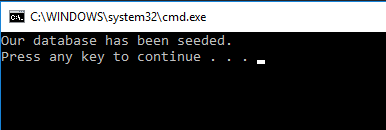
 We run our program and see the message we placed on the last line of the main method, showing that our seed should be finished.
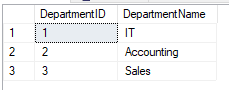
 This is confirmed upon review of our tables.
Departments
This is confirmed upon review of our tables.
Departments
 Employees
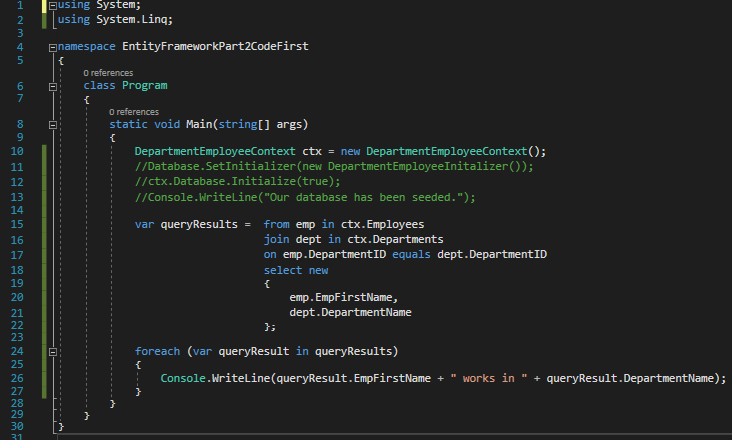
 We can then comment out the old code in Program.cs and replace it with the following to query our data (where I show each employee and the name of the department they work in).
Program.cs
We can then comment out the old code in Program.cs and replace it with the following to query our data (where I show each employee and the name of the department they work in).
Program.cs
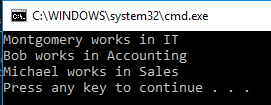
 We run our program and see which department each employee works in.
 Excellent! We now have a working program that tells us the name of every employee in the database and which department they work in. Now let’s say we deployed this application into production, and a few months later we are approached with a new requirement; the application must keep track each employee’s salary and display it on the console (excluding the salaries of the employees already in there). This means we would have to modify the Employee model to utilize a new field. How can we do this without compromising the data that is already in our database?
Code First Migrations
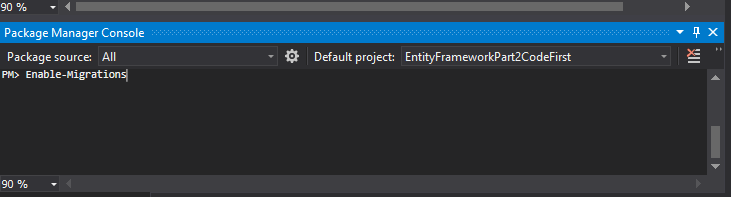
In order to apply more changes to our database, we need to perform a Code First Migration. In the Package Manager Console, type Enable-Migrations.
Excellent! We now have a working program that tells us the name of every employee in the database and which department they work in. Now let’s say we deployed this application into production, and a few months later we are approached with a new requirement; the application must keep track each employee’s salary and display it on the console (excluding the salaries of the employees already in there). This means we would have to modify the Employee model to utilize a new field. How can we do this without compromising the data that is already in our database?
Code First Migrations
In order to apply more changes to our database, we need to perform a Code First Migration. In the Package Manager Console, type Enable-Migrations.
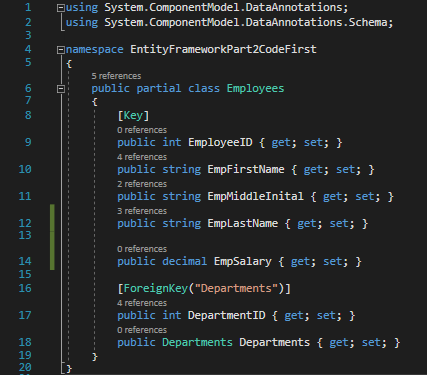
 This generates a Migrations folder containing two files; Configuration.cs and InitialCreate.cs. We will be adding to the Configuration file later. For now, let us add a salary field to our Employee model. Change the file so that it matches the image below:
Employee.cs
This generates a Migrations folder containing two files; Configuration.cs and InitialCreate.cs. We will be adding to the Configuration file later. For now, let us add a salary field to our Employee model. Change the file so that it matches the image below:
Employee.cs
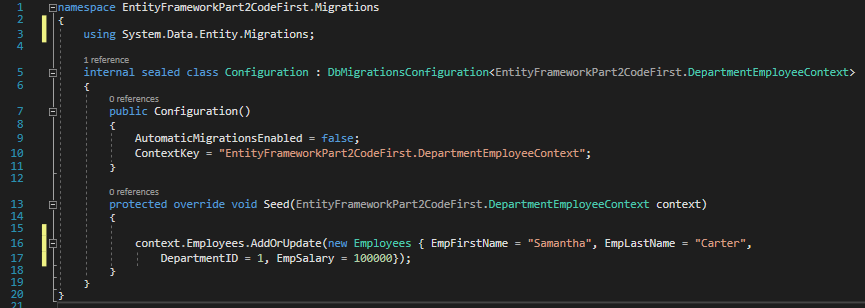
 Now modify the Configuration.cs file to contain the code below:
Configuration.cs
Now modify the Configuration.cs file to contain the code below:
Configuration.cs
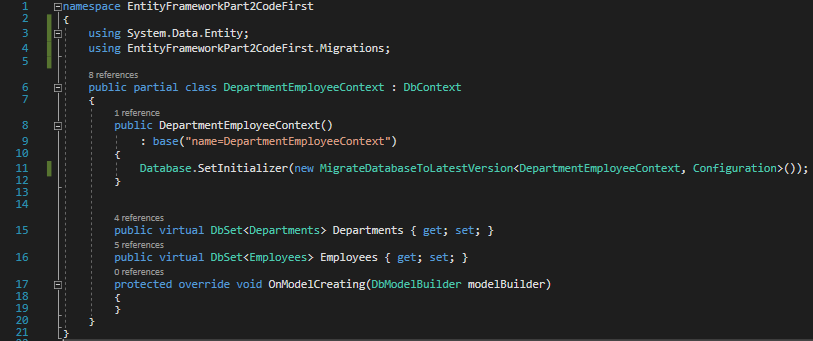
 Next we will call the configuration file from our DepartmentEmployeeContext file.
DepartmentEmployeeContext.cs
Next we will call the configuration file from our DepartmentEmployeeContext file.
DepartmentEmployeeContext.cs
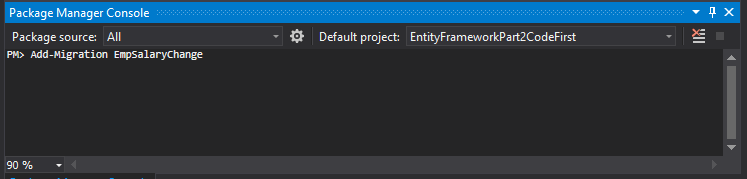
 Now it is time to add our migration. In the Package Manager Console, type Add-Migration EmpSalaryChange.
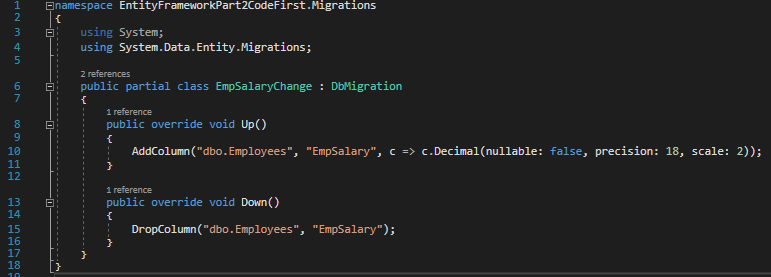
 We see that an EmpSalaryChange.cs file has been generated for us in the Migrations folder.
EmpSalaryChange.cs
We see that an EmpSalaryChange.cs file has been generated for us in the Migrations folder.
EmpSalaryChange.cs
 Now type Update-Database to push our changes to the database.
 We see our Employees table has been modified with the original data intact and the new data added.
 Auto Generate Code From An Existing Database
Sometimes you will have an application that needs to connect to an already existing database. We have already seen how we can code models for each table and create a database context, and we know that it can be a time consuming process. How can we quickly generate models for already existing tables?
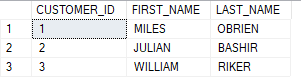
Let’s say that we have been given a contract by a customer, named Quark. He needs an application that can keep track of frequent customers and their transactions, as the one he is currently using is out of date. He still has the database intact with the tables and data below (you can download the SQL code at my Github page here so you can create the DB and follow along):
Customers
Auto Generate Code From An Existing Database
Sometimes you will have an application that needs to connect to an already existing database. We have already seen how we can code models for each table and create a database context, and we know that it can be a time consuming process. How can we quickly generate models for already existing tables?
Let’s say that we have been given a contract by a customer, named Quark. He needs an application that can keep track of frequent customers and their transactions, as the one he is currently using is out of date. He still has the database intact with the tables and data below (you can download the SQL code at my Github page here so you can create the DB and follow along):
Customers
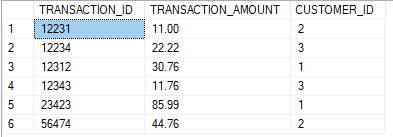
 Transactions
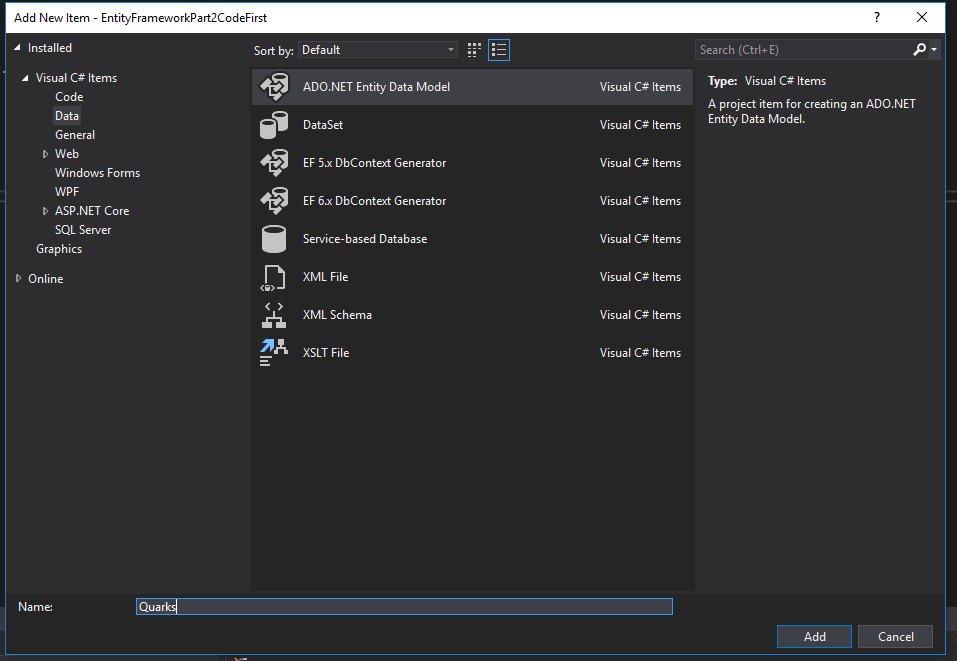
 Let’s use our existing application to connect to the database and have Entity Framework generate the necessary code for us using the Code First Approach. Create a new ADO.NET Entity Model, called Quarks:
 Select Code First from database and click next.
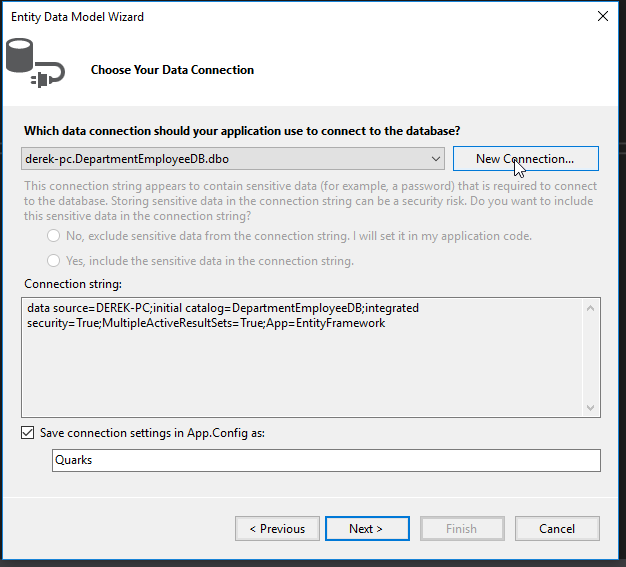
 Click New Connection (in my example, I will be using the same SQL Server from before).
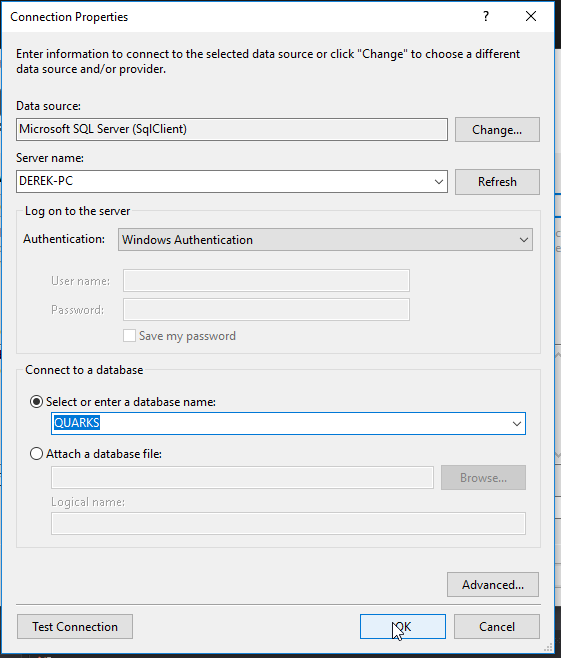
 Select the QUARKS database and click OK.
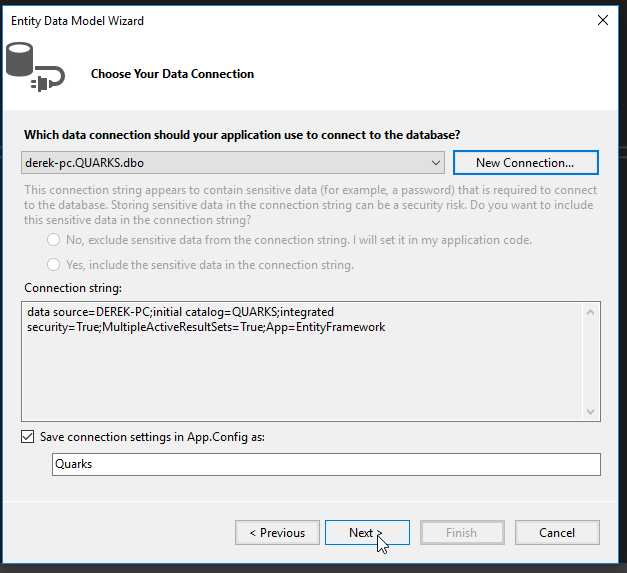
 Click Next
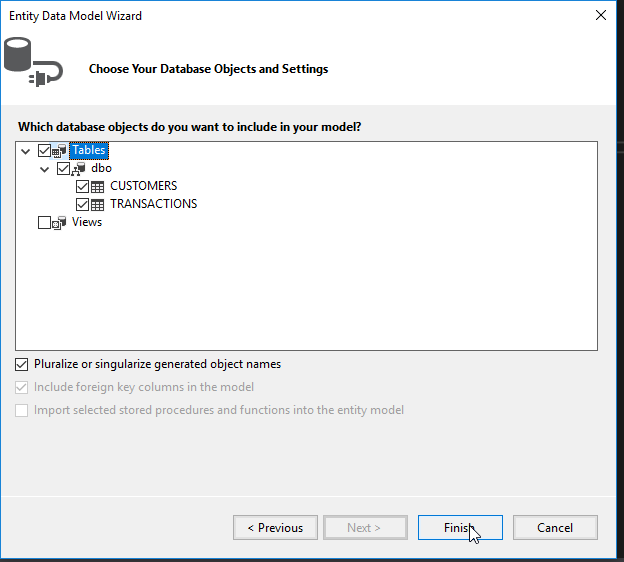
 Select the Customers and Transactions tables and then click on Finish
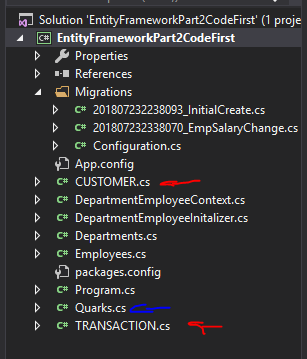
 The arrows point to files that have been generated for us by Entity Framework. The blue arrow points to our Database Context while the red arrows point to the models within that database context.
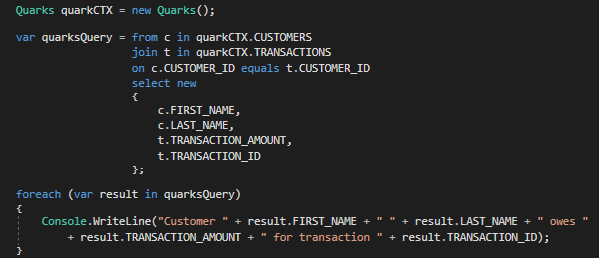
 In our Program.cs file, comment out the existing code in our main method and add the new code shown below. The will pull up a list for Quark that will tell him how much Gold-Pressed Latinum is owed per transaction and who owes it (sorry Qui-Gon, but credits will not do fine).
Program.cs
In our Program.cs file, comment out the existing code in our main method and add the new code shown below. The will pull up a list for Quark that will tell him how much Gold-Pressed Latinum is owed per transaction and who owes it (sorry Qui-Gon, but credits will not do fine).
Program.cs
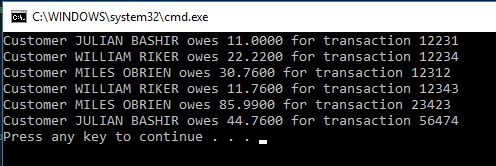
 Excellent! Our client now has a list of transactions!
 Data Annotations and Fluent API
If you looked at the SQL code I provided for this exercise, you may be wondering how Entity Framework is able to translate SQL Server’s Money datatype to one that the .NET CLR can use. Let’s take a look at our Transaction model:
Transaction.cs
Data Annotations and Fluent API
If you looked at the SQL code I provided for this exercise, you may be wondering how Entity Framework is able to translate SQL Server’s Money datatype to one that the .NET CLR can use. Let’s take a look at our Transaction model:
Transaction.cs
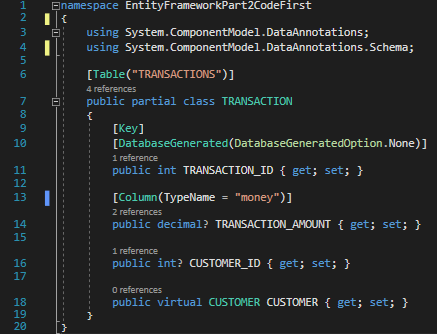 Notice the code between the square brackets on linke 13? This is called a Data Annotation. It allows the developer to assign special characteristics to an attribute. In this case, we see that our code is telling EF “the model uses a nullable decimal datatype, but the corresponding field in SQL Server uses the Money datatype”. We can also see on like 9 that we are assigning the TRANSACTION_ID as our primary key in the model.
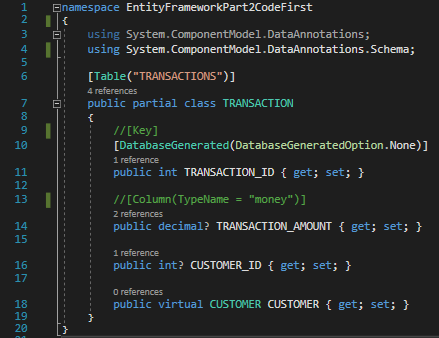
Entity Framework gives us another means of assigning these special characteristics. Comment out lines 9 and 13 in TRANSACTION.cs:
Transaction.cs
Notice the code between the square brackets on linke 13? This is called a Data Annotation. It allows the developer to assign special characteristics to an attribute. In this case, we see that our code is telling EF “the model uses a nullable decimal datatype, but the corresponding field in SQL Server uses the Money datatype”. We can also see on like 9 that we are assigning the TRANSACTION_ID as our primary key in the model.
Entity Framework gives us another means of assigning these special characteristics. Comment out lines 9 and 13 in TRANSACTION.cs:
Transaction.cs
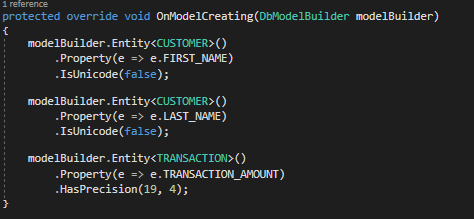
 In our database context file (QUARKS.cs), take note of the OnModelCreating method. The code there seems to be assigning special properties to attributes in our models as well. The code in that method does this by using a tool called Fluent API.
Quarks.cs
In our database context file (QUARKS.cs), take note of the OnModelCreating method. The code there seems to be assigning special properties to attributes in our models as well. The code in that method does this by using a tool called Fluent API.
Quarks.cs
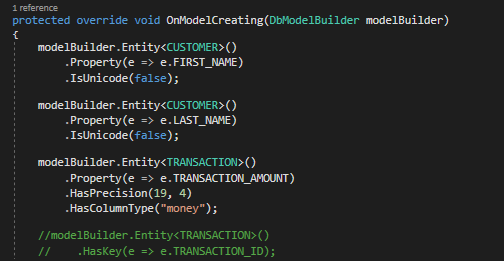
 Let’s use Fluent API to assign the special properties that we commented out in Transaction.cs. Change the content of the OnModelCreating method to match what you see below:
Quarks.cs
Let’s use Fluent API to assign the special properties that we commented out in Transaction.cs. Change the content of the OnModelCreating method to match what you see below:
Quarks.cs
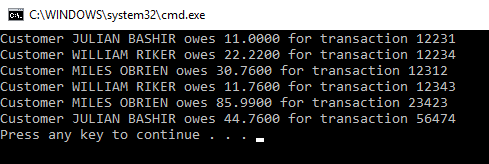
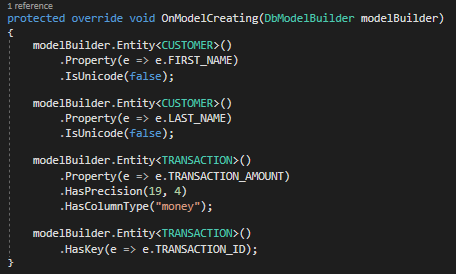 We have used Fluent API to tell Entity Framework to treat TRANSACTION_AMOUNT as a money datatype and TRANSACTION_ID as a primary key when talking to our database. When we run our program, we see that it is still functioning:
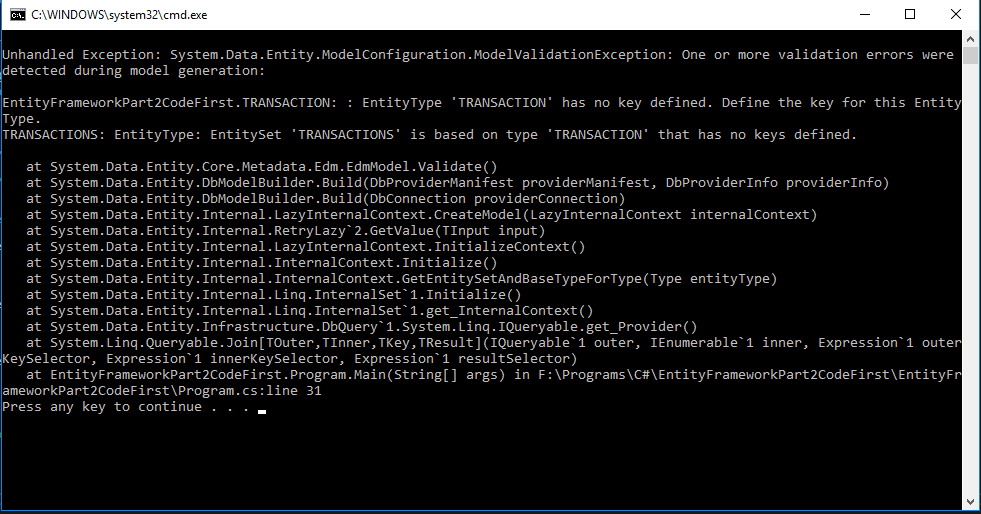
 However, if we were to comment out the HasKey assignment…
 And then run our code again, the program would crash. This is because EF needs to know what KEY we are using for the Transaction model:
 When to Tweak Code Generated for You by EF
There may be times when Entity Framework does not translate tables to models in ways that you would expect. For example, when working with an Oracle database, I frequently found that many of the attributes that I wished to have a datatype of int ended up being decimal. This was due to that attribute simply being assigned the NUMBER datatype in the Oracle db. In Oracle, a field with the datatype of Number needs to have the precision explicitly defined in order for Entity Framework to translate what datatype it should be in .NET. If the field is defined as NUMBER with no precision defined, Entity Framework will assigned it a decimal datatype, which takes more memory than an int or long. To save memory, I had to determine if a decimal datatype was needed for such fields and assign it the correct one (if needed).
Another instance where you may need to modify the code is if you are working with tables without primary keys. Remember how in my example from before, our program crashed when I did not define a primary key for the Transaction model? Entity Framework needs to have unique keys defined in order to perform CRUD options on the database. To get around this problem, you can select a unique sequence of attributes to create a composite key.
You will likely run into many other scenarios where you will need to modify the auto-generated code, but it is good to know that the option is there. Not all tweaks require a migration (in fact, you will likely want to leave your database as is if you are not the one who manages it), but you at least will be able to change how your program interprets the data it receives from the ORM.
Summary
Utilizing the Code First Approach allows the most flexibility for a developer, as it helps them design their own databases from scratch, or connect to and modify existing ones. However, it is still only one of three approaches to tie an application to a database. In the next post, we will cover the Database First approach, which is specifically designed for connecting applications to existing databases.
Have any questions, comments, or concerns about this post? Notice anything that can be added or improved? If so, please let me know in the comments. I look forward to hearing from you!
When to Tweak Code Generated for You by EF
There may be times when Entity Framework does not translate tables to models in ways that you would expect. For example, when working with an Oracle database, I frequently found that many of the attributes that I wished to have a datatype of int ended up being decimal. This was due to that attribute simply being assigned the NUMBER datatype in the Oracle db. In Oracle, a field with the datatype of Number needs to have the precision explicitly defined in order for Entity Framework to translate what datatype it should be in .NET. If the field is defined as NUMBER with no precision defined, Entity Framework will assigned it a decimal datatype, which takes more memory than an int or long. To save memory, I had to determine if a decimal datatype was needed for such fields and assign it the correct one (if needed).
Another instance where you may need to modify the code is if you are working with tables without primary keys. Remember how in my example from before, our program crashed when I did not define a primary key for the Transaction model? Entity Framework needs to have unique keys defined in order to perform CRUD options on the database. To get around this problem, you can select a unique sequence of attributes to create a composite key.
You will likely run into many other scenarios where you will need to modify the auto-generated code, but it is good to know that the option is there. Not all tweaks require a migration (in fact, you will likely want to leave your database as is if you are not the one who manages it), but you at least will be able to change how your program interprets the data it receives from the ORM.
Summary
Utilizing the Code First Approach allows the most flexibility for a developer, as it helps them design their own databases from scratch, or connect to and modify existing ones. However, it is still only one of three approaches to tie an application to a database. In the next post, we will cover the Database First approach, which is specifically designed for connecting applications to existing databases.
Have any questions, comments, or concerns about this post? Notice anything that can be added or improved? If so, please let me know in the comments. I look forward to hearing from you!