
Angular Walkthrough Part 2: Setting Up Our Development Environment
Welcome back everyone! Thank you for joining me again as we continue to learn how to develop SPAs with Angular. In today’s blog post, we will be discussing how to setup an Angular development environment on our computers. If this is your first time joining me for this series, I highly encourage you to read my first post where I introduce and discuss Angular at a high level.
The following items will be discussed in today’s post:
- How to install Node.JS.
- How to install the Angular CLI.
- The different IDEs and code editors we can use to develop our Angular applications.
- How to create and run our first Angular application.
Before we proceed any further, I want to note that I will working with a Windows 10 machine. Setup and development with OSX or Linux should be similar, but you may notice some slight differences.
Installing Node.JS
To properly use the Angular CLI, we must first install Node.JS, as it allows us to locally host our application as we develop it. To install Node.JS on a Windows or Mac device, navigate to https://node.js.org and click on the download link in the top banner. You will then be greeted with the menu displayed below.

Select the version of Node.JS that is compatible with your operating system to initiate the download. In my case, I am selecting the 64-bit version of the Windows Installer as I am using Windows 10 64-bit on my machine. Once downloaded, run the installer and keep all the default settings.
Installing the Angular CLI
The Angular CLI allows us to create and manage our Angular applications from the command line interface. After Node.JS is installed, open a command prompt/terminal (Run as Admin if you are using Windows) and type the following to install it:
npm install -g @angular/cliThis will install the Angular CLI to your PC. During the time I recorded the video for this blog post, the latest version of the CLI was 7.3.9.
Which IDE/Code Editor Should I Use?
Now that we have Node.JS and the Angular CLI installed, we should pick an IDE or code editor we can use to develop our application. So which one is the best to use? To be honest, whichever you feel most comfortable developing with. Personally, I prefer using either Visual Studio Code or Visual Studio to develop my applications. In fact, Visual Studio makes it easy for ASP.NET Core developers to quickly create an Angular application by including an Angular template that has a basic Angular frontend and ASP.NET Core Web API backend setup for you. However, you may prefer to use other development tools such as Web Storm, Atom, or Sublime. Pick whichever one you are most comfortable with and you should be good to go (I will be using Visual Studio Code for the series).
Creating Our First Angular Application
Open a command prompt/terminal (Run as Admin if you are using Windows), and switch to your development directory. Once you have done this, type the following to create a new Angular application called my-test-app:
ng new my-test-appWhen prompted to add routing, type “y” and hit enter. You will then be asked which stylesheet format you would like to use (I will be using CSS). Wait for a few moments until your application is created. Since we created an application called my-test-app in our development directory, we will now have a folder there with the same name. From your command prompt/terminal, navigate to the my-test-app directory. You can then start your application in a new browser session by typing the following:
ng serve -oThe “ng serve” portion of the command allows us to host the application on our development environment, and the “-o” portion forces a new window from our default web browser to show the application. By default, our application will be hosted on localhost:4200. When you enter the command to your command prompt/terminal, our application will compile. If successful, you web browser should be showing something similar the image below:
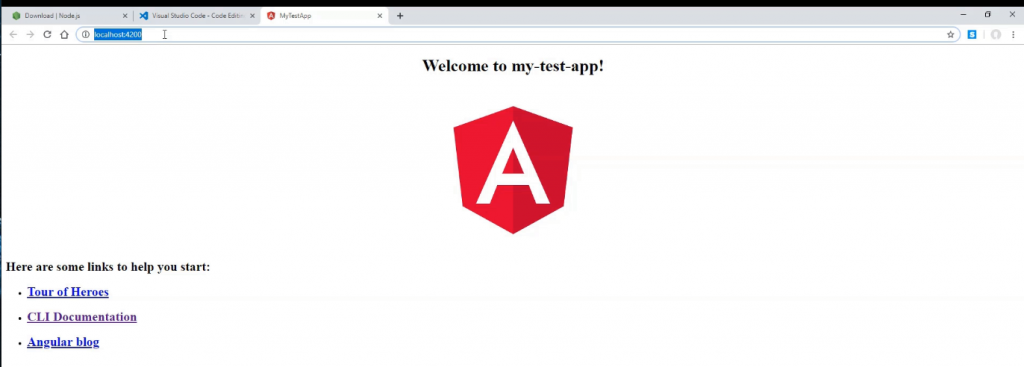
If this is what you are seeing, you have successfully run your first Angular application!
Up Next
In our next post, we will be exploring the layout of our Angular application, so we can better understand how our files communicate with each other. Some of the content will be familiar to what we have seen in Part 1, but we will be taking a deeper dive to get a more technical understanding. Until then, take care and have an excellent day!